Bird Cage
Written for PSP 6.
PSP 7 users please note, this will work in ver 7.
Tools may be located differently then stated in the instructions.
Also, draw all elipses using the right mouse button.
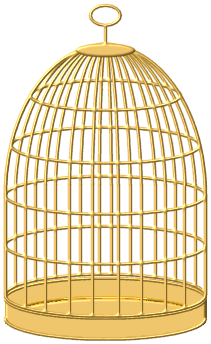
This tutorial may be printed for your own use.This tutorial came about as a direct result of the Basic Oval/Circular Cage tutorial located on my Basic Tutorial's Page. This is not necessarily the only, or the best way to make a birdcage, it is just a method that works. For this tutorial it is very important to follow the ruler settings exactly, even a one pixel difference could ruin the final image. So make sure your rulers are turned on. For those that don't know about the rulers they appear along the top and left side of your image work area. To turn them on or off go to the main menu along the top and choose View/Rulers. Just so we all are working from the same plan, all ruler references are given for the top ruler first then the side ruler. ie: 200x300 means the ruler marker should be on 200 on the top ruler and 300 on the side ruler. Also the word "Choose" is used for selecting tools from the tool bar and "Go to" for items on the main menu. 1. Open a New Image/400x400/BG White/16 mil colours. 2. Go to Layers/New rastor layer. Name this layer "front". 3. Set the Foreground colour to #FDB303 or any other colour you would like. 4. Choose Preset shapes/Elipse/Stroked/3/Antialias checked/Create as vector unchecked. Draw an elipse from 200x200 to 300x350. 5. Choose the Selection Tool/Rectangle. Draw a rectangle from 90x200 to 310x360. Press the Delete key on the key board once or go to Edit/Clear. 6. Go to Selections/Select None. 7. Choose the Draw Tool/Single Line/Stroked/3/Antialias checked/Other two unchecked. Draw a line from: 90x200 to 90x300, 300x200 to 300x300. Your image should look similar to fig 2.
8. Go to Layers/Duplicate. Rename this duplicate layer "back". 9. Go to Layers/New rastor layer. Name this layer "front rings". 10. Choose Preset shapes/Elipse same settings as before. Draw an elipse from: 200x300 to 300x320, 200x250 to 300x270, 200x200 to 300x220, 200x150 to 295x170, 200x100 to 275x115. You should have something similar to fig 3.
11. Go to Layers/Duplicate. Rename this layer "back rings". 12. With the "back rings" layer the active layer, choose the Selection Tool/Rectangle/Feather 0/Antialias unchecked. Draw a rectangle from approximately 120x100 to 280x120. Press the Delete key on your keyboard or go to Edit/Clear. See fig 4. Continue on down removing the front half of all the rings, including the bottom one.
13. Go to Selections/Select None. 14. Go to the Layers Palette and turn off the "back" and "back rings" layers by clicking on the pair of glasses.
15. Now make the "front rings" the active layer and do the same thing we did in step 12 only this time remove the back portion of the rings, fig 5.
16. Go to the Layers Palette and turn off the "background" layer. Leave the "back" and "back rings" turned off. 17. Make either "front" or "front rings" the active layer. 18. Go to Layers/Merge/Merge Visible. Rename the Merged layer, "front". (To rename this layer, right click on the "Merged" layer, then choose "Properties". In the "Name" box type in the new name then click Ok. 19. Go to the Layers palette and turn off the "front" and "front rings" layers. Turn on the "back" and "back rings" layers. Make one of these last two the active layer. 20. Go to Layers/Merge/Merge Visible. Rename the Merged layer, "back". 21. Make the "front" layer the active layer. 22. Go to Layers/New Rastor Layer. Name it "front bars". 23. Choose Preset shapes/Elipse with the same settings as before. We will now draw a series of bars as follows: 200x200 to 280x350, 200x200 to 260x350, 200x200 to 235x350, 200x200 to 215x350. Your image should look similar to fig 7 minus the marching ants.
24. Choose the Selection Tool/Rectangle same settings as before. Draw a rectangle from 90x190 to 310x360, should be similar to fig 7 above. Press Delete on the keyboard or choose Edit/Clear. 25. Go to Selections/Select None. 26. Choose the Draw Tool/Single Line/Stroked/3/Antialias checked/Other two boxes unchecked. Draw the straight portions of the front bars from the deleted ends of the elipses to the bottom ring. Your image should look similar to fig 8.
27. Go to Layers/New Rastor Layer. Rename this layer "back bars". 28. Choose Preset shapes/Rectangle with the same settings as before. Draw a series of elipses as follows: 200x200 to 290x350, 200x200 to 270x350, 200x200 to 250x350, 200x200 to 225x350, 200x200 to 205x350. Your image will now look like one big mess of lines/bars. Don't be concerned, it will look ok once we are finished. 29. Go to the Layers Palette and turn off the "front" and "front bars" layers. 30. Choose the Selections Tool/Rectangle, same settings. Draw a rectangle from 90x190 to 310x360. Press the Delete key or go to Edit/Clear. 31. Choose the Draw Tool/Single Line, same settings. Draw the straight portions of the back bars from the deleted ends of the elipses to the bottom ring. Your image should look similar to fig 9.
30. Go to the Layers Palette and turn off the "background" layer and make sure the "front" and "front bars" layers are both still turned off. 31. Go to Layers/Merge/Merge Visible. Rename this Merged layer, "back". 32. Go to the Layers Palette and turn off the new "back" layer and turn on the "front" and "front bars" layers. 33. Go to Layers/Merge/Merge Visible. Rename this Merged layer, "front". It is now time to apply the Effects that will give the cage depth. For this use your favourite filter, if however you are like me and do not have Eyecandy or Bladepro then we will use PSP to accomplish this task. Which PSP effect you use is entirely up to you. You might want to try playing with different effects until you get one you like. For this tutorial I will be using Sculpture. 34. With your "back" layer active, choose Magic Wand/RGB/0/0/Box unchecked. Click on any part of the image. 35. Go to Image/Effects/Sculpture. In the Presets box choose "gold". Do not change any of the other settings. Click Ok. 36. Go to Selections/Select None. 37. Go to Layers/Arrange/Move down. Your "back" layer should now be under the "front" layer on your Layers Palette. 38. Go to Layers Palette and turn on the "front" layer. 38. Choose the Magic Wand and click on any part of the "front" layer image. 39. Go to Image/Effects/Sculpture. In the Presets box choose "gold". Do not change any of the other settings. Click Ok. 40. Go to Selections/Select None. 41. Go to Layers/New Rastor Layer. Name this layer "hanger". 42. Choose Preset shapes/Circle. The settings are the same as we used for the elipses. Draw a small circle from 200x20 to 215x30. See fig 10. 43. Choose Preset shapes/Elipse. Change the Style to Stroked. Draw an elipse from 200x55 to 230x60. See fig 11. 44. Choose the Draw Tool/Single Line. Same settings as before. Draw a single line from 200x30 to 200x50. See fig 12. (Note: You may want to make the hanger a little smaller or thicker. I made it like this so it would be easier to see and work with during this tut.)
46. Go to Image/Effects/Sculpture. Choose the "gold" preset. Click Ok. See fig 13 above. Effectively the Bird Cage is now completed, however you may have noticed that it has no bottom. A bottom could have been put on back at the beginning stages of this tutorial, giving this cage a bar bottom. However, this would have placed a needless restriction oh how the cage is used. For example you may want to add an extension to the cage, or possibly use a fancy pan, the possibilities are endless. If you save the "front" and "back" layers seperately as tubes you will always have a cage when you need it and may add whatever type of bottom you want at that time. For those not sure how to make a bottom, the remaining portion of this tutorial should be of some help. A Bottom or Pan. 47. To save time we will make all of the layers we will need, now. Make sure the "background" is the active layer because we want all the new layers to be just above it. Using Layers/New Rastor Layer, make five new layers in this order and give them these names; 1. pan bottom, 2. pan back, 3. pan ring back, 4. pan front, 5. pan ring front. 48. Go to the Layers Palette and turn off the "back", "front" and "hanger" layers. The make the "pan bottom" the active layer. 49. Choose Preset Shapes and change the style to, Filled. Draw an elipse from 200x320 to 300x340. 50. Go to Image/Effects/Sculpture and choose the "gold" preset. Click Ok. 51. Go to the Layers Palette and turn off the "pan bottom" and turn on the "pan back" layer. 52. Choose Preset Shapes and change the style to, Stroked and uncheck Antialias. Draw an elipse from 200x300 to 300x320. 53. Choose the Selection Tool/Rectangle, same settings as before. Draw a rectangle from approximately 80x300 to 320x330. Press the Delete key on keyboard or go to Edit/Clear. 54. Go to Selections/Select None. 55. Choose Preset Shapes, same settings. Draw an elipse from 200x 320 to 300x340. 56. Choose Selection Tool/Rectangle, same settings. Draw a rectangle from approximately 80x320 to 320x350. Press the Delete key or use Edit/Clear. 57. Go to Selections/Select None. 58. Choose the Draw Tool/Single line, same settings we used before. Draw a single line on boths sides to join the two halves of the elipse. See figs 14 & 15.
59. Choose Flood Fill and flood fill inside the back piece. 60. Go to Image/Effects/Sculpture. Choose the "gold" preset, click Ok. 61. Choose Preset Shapes/Elipse, check the Antialias box. Draw an elipse from 200x320 to 300x340. 62. Choose the Selection Tool/Rectangle, same settings. Draw a rectangle from approximately 80x320 to 320x350. Press the Delete key or use Edit/Clear. 63. Go to Selections/Select None. 64. Choose the Magic Wand. Click anywhere on this new half elipse. 65. Go to Image/Effects/Sculpture. Choose the "gold" preset, click Ok. 66. Go to Selections/Select None. 67. Make the "pan front" the active layer. 68. Choose Preset Shapes, uncheck Antialias. Draw an elipse from 200x320 to 300x340. 69. Choose the Selection Tool/Rectangle, same settings. Draw a rectangle from approximately 200x320 to 300x290. (Note: we are going up with the rectangle not down.) Press the Delete key or Edit/clear. 70. Go to Selections/Select None. 71. Choose Preset Shapes, same settings. Draw an elipse from 200x300 to 300x320. 72. Choose the Selection Tool/Rectangle, same settings. Draw a rectangle from approximately 80x300 to 320x270. Press the Delete key or use Edit/Clear. 73. Go to Selections/Select None. 74. Choose the Draw Tool/Single Line, same settings. Draw a single line on each side to join both the half elipses, the same as we did for the back figs 14 & 15. 75. Choose Flood Fill and fill inside the front piece. 76. Make the "pan ring back" the active layer. 77. Choose Preset shapes/Elipse, check Antialias. Draw an elipse from 200x300 to 300x320. 78. Choose the Selection Tool/Rectangle, same settings. Draw a rectangle from 80x300 to 320x330. Press the Delete key or use Edit/Clear. 79. Go to Selections/Select None. 80. Go to Image/Effects/Sculpture, choose the "gold" preset, click Ok. 81. Go to the Layers Palette and turn off all the layers except, "background", "pan front" and "pan rings front". Make "pan rings front" the active layer. 82. Choose Preset Shapes/Elipse, same settings. Draw an elipse from 200x320 to 300x340. 83. Choose Selection Tool/Rectangle, same settings. Draw a rectangle from 80x320 to 320x350. Press the Delete key or use Edit/Clear. 84. Choose Preset Shapes/Elipse, same settings. Draw an elipse from 200x300 to 320x290. 85. Choose Selection Tool/Rectangle, same settings. Draw a rectangle from 80x300 to 320x270. Press the Delete key or use Edit/Clear. 86. Go to Selections/Select None. 87. Choose the Magic Wand. Hold down the Shift key and click once on each half of the elipses. 88. Go to Image/Effects/Sculpture, choose the "gold" preset, click Ok. 89. Go to the Layers Palette and turn off the "background" layer. Make sure "hanger", "front" and "back" layers are turned off. Turn on all of the pan layers and make sure one of them is the active layer. 90. Go to Layers/Merge/Merge Visible. Rename this layer "pan" Your finished pan should look something like fig 16.
91. Go to the Layers Palette and turn on all the layers, make the "pan" layer the active layer. If you look closely at where the pan joins the cage you will notice that the top ring of the pan is hidden by the cage. This resulted because I wanted to make the construction of the pan easier by using whole numbers on the rulers.
92. To align the pan with the bottom of the cage choose the Mover Tool To place a bird or other object inside the cage make a new rastor layer between the "front" and "back" layers. The cage may be saved as a tube in 3 seperate pieces. The Front, the Back and the Pan. You could also save the Hanger as a seperate piece or merge it with the Front. For those that do not know how to save an image as a tube these are the steps that would have to be take for each part. I will use the pan as an example (Note: In order to make a tube the image must have only one layer, be 24 bit and the background must be transparent.) 1. Make the "pan" layer the active layer and turn off all the other layers. 2. Go to Edit/Copy then Edit/Paste/As New Image. 3. Go to File/Export/Picture tube. 4. In the pop up window leave all the settings as they are and type in a name for your pan in the Tube Name box. ie: Birdcage - pan.
That is all there is to it. When you want the pan simply choose the Tube Tool, If you would like to see this birdcage in a scene click here. Use your browser back button to return here. I hope you have enjoyed working with this tutorial. If you should run into any difficulties please do not hesitate to ask me for help. Click here, Eaglefeather, to send me an email. Cheers Eaglefeather |

|
|
The entire contents of this page � Robert Valiquette, aka Eaglefeather, February 2001.
All rights reserved.
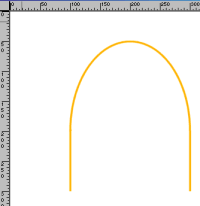 Fig 2.
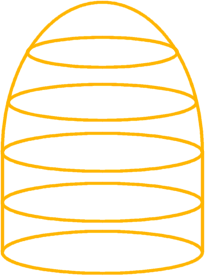 Fig3.
Fig3. Fig 4.
 Fig 5.
 Fig 6.
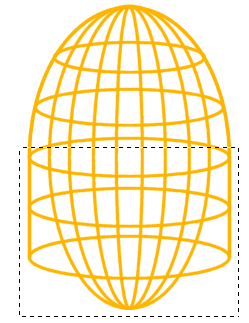 Fig 7.
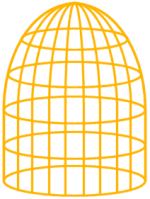 Fig 8.
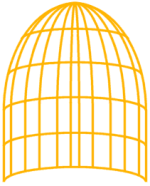 Fig 9.




 Fig 16.