Glass Bowl
Written for PSP 6 but will work in PSP 7.
This is an advanced level tutorial, however those new to PSP should be able to accomplish it, if they work slowly and carefully.
(PSP 7 users please note, this will work in ver 7 however tools may be located differently then stated in the instructions. Also, draw all elipses using the right mouse button.)
 |
 |
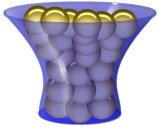 |
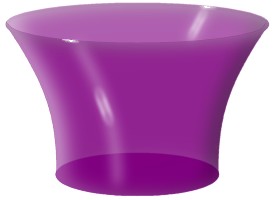
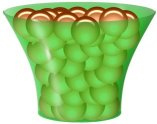
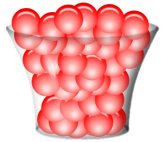
I have been playing around with bowls for quite sometime and have wanted to make a tutorial for them, but just never seemed to have the time, or something else would come up. Well anyway I finally got to it and this tutorial is the result.By playing with the Bezier Curve the entire look and character of the bowl may be changed. If you play around with it you will be amazed at what may be accomplished. This bowl may be made in any colour you want, including clear glass. If you decide to make it in clear glass some of the steps will be different, I've noted those, and some are not required at all, these ones are obvious. Just so we all are working from the same plan, all ruler references are given for the top ruler first then the side ruler. ie: 200x300 means the ruler marker should be on 200 on the top ruler and 300 on the side ruler. Also the word "Choose" is used for selecting tools from the tool bar and "Go to" for items on the main menu. One final note before we begin. It was not my intention to insult your inteligence, but rather to ensure that all users of this tutorial, regardless of PSP experience, would have as little difficulty as possible. I found some parts of this tutorial very difficult to explain so all would understand what I talking about. So in those places where it seems I have stated the obvious please bear with me. 1. Make a new image, go to New/400x400/Transparent/16 mil colours. 2. Go to Layers/New Rastor Layer, name it "back frame". 3. Set the Foreground colour to #800080 a dark purple, or to any colour you wish. 4. Choose Preset Shapes/Elipse/Stroked/Size 3/Antialias checked/Create as vector Unchecked. Draw an elipse from 200x100 to 330x120. Then draw another elipse from 200x250 to 280x270. 5. Go to layers/New Rastor Layer. 6. Choose the Draw tool/Bezier Curve/Stroked/Width 3/Antialias checked/Create as vector and Close Path Unchecked. Draw a line from 70x100 to 120x250. Place the cursor at 70x100 press and hold the left mouse button as you pull the line to 110x160. Place the cursor at 120x250 press and hold the left mouse button as you pull the line to 120x210. See fig 2. Sorry but couldn't get a screen capture pulling up the bottom portion.
7. Go to Edit/Copy. 8. Go to Image/Mirror. It may be necessary to move this a little to get it to position properly on the right side. Mine mirrored exactly so a move was not necessary. 9. Go to Edit/Paste/As new selection. Move this piece into position on the left side. 10. Go to Selections/Select None. 11. Go to the Layers Palette and turn off layer 1 by clicking on the glasses. (Layer 1 should be the very bottom layer and there shouldn't be anything on it. I always like to have an empty layer on the bottom. If you don't then you could just delete it.) Make sure that either the "back frame" layer or the layer with the bezier curves is the active layer. 12. Go to Layers/Merge/Merge Visible. 13. Go to the Layers palette, right click on the Merged layer then left click on Properties rename this layer "back frame" by typing it in the name box. Then click Ok. 14. Go to Layers/Duplicate. 15. Go to the Layers palette, and rename this duplicate layer "front frame". Then click on the glasses to turn off the "front frame" layer. 17. With the "back frame" layer the active layer choose the Eraser tool/Round/Size 15/ Hardness 100/Opacity 100/Step 1/Density 100. Begining at the left side erase the front portion of the top ring, figs 3 & 4, then go to the bottom and erase the front portion of the bottom ring, figs 5 & 6.
18. Go to the Layers Palette and turn off the "back frame" and turn on the "front frame". 19. Choose the Eraser tool again with the same settings and remove the the back portions of the top and bottom rings. Just the reverse of what we did with the "back frame". Are we having fun yet? Good, it gets even better. :) 20. With the "front frame" the active layer, Go to Layers/Duplicate Layer, no need to name it. 21. Go to Layers Palette and turn off the"front frame" layer 22. Choose the Flood Fill tool and flood fill the inside of the frame. 23. Choose the Paintbrush tool/Round/Size 5/Hardness, Opacity and Density 100/Step 1. Paint in the outline that resulted because of the antialias used on the frame. See fig 7.
25. Choose the Selection tool/Rectangle. Settings unimportant. Draw a rectangle around the outside of the image. Place the cursor inside the image and click once. Marching ants should appear all around the flood filled area. (Note: If you are making a clear bowl, Do Not use the Selection Tool. Instead use the Magic wand. Click outside the image, then go to Selections/Invert.) 26. Go to Image/Effects/Cutout. Use these settings: Fill interior with color - Unchecked/Shadow colour - Black/Opacity 53/Blur 27.6/Offsets - Verticle 1/Horizontal - 11, (thats minus 11). 27. Go to Image/Effects/Cutout. Change shadow color to White and Horizontal Offset to 11. (Note: If you are making a clear bowl, Go to Layers/New Rastor layer. Then Go to Image/Effects/Cutout. Leave the shadow color Black but change the Horizontal Offset to 11). Now Merge the two layers that have the "Cutout". 28. Go to Selections/Select None. (Note: If you are making a Clear Glass Bowl go to step 31 after completing this step.) 29. Go to the Layers Palette and move the slider on the "glass front" layer to about 63, see fig 9.
30. Still on the Layers Palette activate the "front frame" then move the slider to between 2 and 6. You must watch your image closely while you do this. You want it to be barely perceptable. What this will do is remove jaggies caused by the cutout. 31. Go to Layers/Merge/Merge Visible. Rename this layer, "front". 32. Go to the Layers Palette and turn off the "front" layer and turn on the "back frame" layer. 33. Go to Layers/Duplicate Layer. 35. Now go back and do all the steps from step 22 to step 30 with this back piece, just remember that any references to the "front" should be interpreted as "back" this time around. 36. Go to Layers palette and make sure the "front" layer is turned off. 37. Go to Layers/Merge/Merge Visible. Rename this layer, "back". We will now add a bottom to our bowl, on the "back" layer. (Note: If you are making a Clear Glass Bowl you may not want to add a bottom. If you don't want a bottom go to step 41. If you do then you will have to apply the Cutout twice just like we did in steps 25, 26 & 27. Or if you would prefer a more solid bottom, make it on a separate layer, use a very light grey, then use the layers palette slider to give it opacity.) 38. Choose Preset Shapes/Elipse. Same settings we used before. Draw an elipse from 200x250 to 280x270. 39. Choose the Flood Fill tool and flood fill inside the elipse. 40. Choose Paintbrush/Round/Size 5, all other settings the same as before. Paint out the outline like we did in step 23. 41. Go to Layers/New Rastor Layer. No name needed. 42. Change Foreground colour to White. 43. Choose the Draw tool/Bezier Curve, same settings as before. Draw the bezier line from 280x85 to 240x150. Place the cursor at 270x85 press and hold the left mouse button as you pull the line to 260x100. Place the cursor at 240x150 press and hold the left mouse button as you pull the line to 245x130. The line should be similar to fig 9. 44. Choose the Eraser tool/Round. Same settings as before. Erase the bezier line below the rim of the front part of the bowl. See fig 10.
46. Go to Layers/New Rastor Layer. No name needed. 47. Choose Preset Shapes/Elipse. Same settings. Draw a small elipse at approximately 260x100. See fig 11.
48. Go to Image/Blur/Blur. 49. Go to Image/Blur/Motion Blur/Angle 28/Intensity 25. 50. Go to Layers/New Rastor Layer. No need to name it. 51. Choose the Paintbrush tool/Size 1. Place a few pixels along the top rim, as in fig 12. 52. Go to Image/Blur/Blur. 52..Choose the Paintbrush tool/Size 1. Place a few white pixels along the top rim, as in fig 13. If these pixels are too stark, then use the Retouch tool/Soften to soften it slightly.
54. Go to Layers/Merge/Merge Visible. Rename this layer "back". 55. Go to the Layers Palette and turn on the "front" layer and make it active. 56. Go to Layers/New Rastor Layer. No need to name it. 57. Choose the Draw tool/Bezier Curve. Same settings as before. Draw a line from 140x120 to 180x160. Place the cursor at 140x120, press and hold the left mouse button as you drag down to 170x170. Place the cursor at 180x260, press and hold the left mouse button as you drag up to 180x210. 58. Go to Image/Blur/Gaussian Blur, same settings. 59. Go to Layers/New Rastor Layer. No need to name it. 60. Choose Preset Shape/Elipse, same settings. Draw a small elipse as we did in step 47. 61. Go to Image/Rotate/left/20 62. Go to Image/Blur/Blur. 63. Go to Image/Blur/Motion Blur/Angle 340/25 pixels. See fig 14. Note: If this eliptical motion blur is not positioned properly, simply use the Mover tool to adjust its position. (While experimenting with these bowls I found that sometimes this blur does not position properly.)
64. Choose the Paintbrush Tool/Round/Size 1. Draw a few white pixels along the rim just above the reflection. See fig 14. 65. Choose the Retouch Tool/Soften/Size 5. Carefully click once or twice over the white pixels to soften them slightly. See fig 15. 66. Choose the Paintbrush/size 1, very carefully add a couple of white pixels ontop of the area we just softened. See fig 16.
68. Make sure the "front" layer is the active layer. 69. Go to Layers/Merge/Merge Visible. 70. Go to the Layers Palette and rename this layer "front". Your bowl is now finished. You should now save it as a tube. Before saving it as a tube you must take into consideration whether or not you will want to put things in it. If you do then you will have to save it in two parts. To save the "front" part, make "front" active layer. Go to Edit/Copy. The go to Edit/Paste/As new Image. Go to File/Export/Picture Tube. Type in a name, such as, "Bowl pur front", then click Ok. Make the "back" layer the active layer. Now do exactly what you did for the "front" except name it something like, "Bowl pur back", then click Ok. Your bowl is now a tube. To use it and place something in it will require 3 layers. The bottom layer must be the "Bowl back". The next layer or layers will be the layer layers where you place the objects you want in the bowl. The top layer must be the "Bowl front". One final note, when you add the front tube, the front may not line up correctly with the back. However if you experiment with it you will find exactly where the centre line for a perfect join is located for each half. For mine I found that if, for example, I place the "back" at 200x200, the front will line up exactly if I place it at 200x210. Another way to line them up is to use the mover tool. I hope you have enjoyed working with this tutorial and did not have too many problems. I have gone over it many times to try and ensure it was correct, but it is always possible to miss something. Should you find something wrong or have difficulty please feel free to send me an EMail. I will do my best to fix the problem and/or help you with the difficulty. Cheers Eaglefeather |

|
|
All rights reserved.
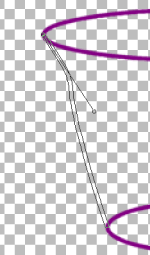 Fig 2.


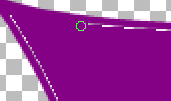 Fig 7.
 Fig 8.
 Fig 9.
  Fig 10.
 Fig 11.
 Fig 12.
 Fig 13.
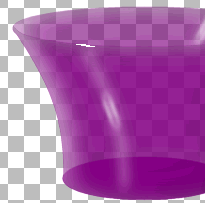 Fig 14.