
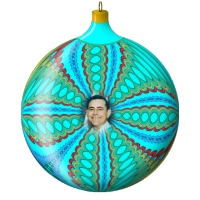
For PSP ver 6, but may work in other versions.
This is a more advanced version of the Ornament Tutorial. The basic method is very similar, however this tut will give a more refined, professional looking ornament and show how to place a light in the ornament for animation. I will also assume that you are familiar with PSP 6, particularly Layers and the Layers Pallet, and Animation Shop. Those new to PSP, might find it easier to follow, if they work with the other Ornament tut, before attempting this one.Because we will be making our own patterns for this tut, everyone will have a unique ornament at the end. You will need an ornament hanger to finish off the ornament. If you already have one great, if not I have provided one below. Right click on the image then click on "Save As or Save Picture As". This will save the image to your harddrive.
To make the ornament hanger image into a tube, open it in PSP. 1. Go to File/Copy. 2. Then go to File/New, make a new image 100x100 with transparent background. 3. Go to File/Paste/As New Layer. (You may now close the original image it is nolonger needed.) 4. Choose the Magicwand Tool then press and hold the "Shift" key. 5. Now click on the white area of the image and keep clicking as you move around. The idea here is to click on a bunch of the different colours of white that are present. As you click around, preferably in the same area, the area inside the "marching ants" will get larger. I used approximately 20 clicks when I tested it. Now once you have an area selected release the "shift" key and press the "Delete" key. Most of the white area should be deleted. Now you have the option of using the Magicwand tool and the shift key to choose any remaining white or do as I did and just use the Eraser Tool. 6. Once all the white is gone, Go to Layers/Merge/Merge All. 7. Then Go to File/Export/As Picture Tube. Give it a name and press OK. The hanger will now be a tube. Sorry for the inconvenience but I was unable to find a new free host that permits downloading of files. To make this tut easier to follow you may print it. Make sure your printer is turned on then Click on the Print button of your browser or go to File/print.
If you would like to see what the ornament looks like after animation, Click here.
2. We are now going to make a pattern for our ornament. This is where we all begin to make an ornament unique to ourselves. No one who follows this tut will end up with the same image. (If you have an image that you would prefer to use for a pattern, or if you want to use the reddot.jpg provided, open the image/pattern in the work area then go to 5. ) 3. So first decide on a background colour, then flood fill. I will use cyan. 4. Choose a colourful tube, you may use more than one. For this project I will be using, "coloured spheres and fish". (fig 1). Both of which should be in your PSP tubes file. Then just place them randomly around the work area, or if you prefer in some kind of order.
5. Choose Image/Deformations/Twirl. The setting is up to you, but I found the best effect was achieved with the slider all the way to the right, at 720. 6. Choose Image/Deformations/Punch. Again the setting is up to you. I am using 50. 7. Go to Image/Effects/Kaleidoscope. Play with the settings, (Particularly Radial Suction and Scale Factor) until you get a pattern you like. I am using these settings ; Horizontal offset = 40, Vertical offset = 44, Rotation angle = 109, Scale Factor = -90, Number of petals = 7, Number of orbits = 2, Radial suction = 59. When you are happy with the design, click OK. If you want to add a feathered photo image to the front of your ornament, this is the time to do it. It is a very simple process and I will walk you through it if you don't know how. If you already know how to do it or do not want to add a photo at this time, go to 12. 8. Open the photo or other image you want to use. Choose the selection tool, set to elipse, antialias and feather checked. The feather setting depends on how much of the area out side the image you want to capture. I found that 30 seems to work pretty well. Once you have decided, place your cursor in the centre or as close to centre of the portion of the image you want to capture. Make your elipse around the subject, but do not go out to far from the subject. Remember that you will have a feather of 30 beyond the part you select. fig's 2, & 3.
10. Close the photo. 11. Choose Edit/Paste/As New Selection. Move the image to the centre of your pattern. Then choose Selections/Select None. 12. Choose Image/Deformations/circle. Your square design should now be a ball. 13. To give us room for our background and to add on the ornament hanger it is necessary to resize the ball. Choose Image/Resize, click on the Percentage of Original radio button, then change the first setting to 80%. The Resize Type should = Smart Size. If there is a check in the "Resize All Layers" box, turn it off. Turn on the check in the "Maintain aspect ratio" box, and set to 1. Click OK. 14. Click on the Mover tool, place the cursor at the exact centre of the image, which should be 300x300. Move the ball down until it is at the 300x340 position. (Note: It is very important to know exactly where the centre of the ball is, so if you decided you want to place it somewhere other than 300x340, then make a note of the final position.) 15. Create a new Rastor Layer, name it Ornament top. 16. Create a new Rastor Layer, name it Hanger. 17. With the Hanger layer the active layer, go to Tubes and choose the ornament hanger, or use your own. Change the scale to 90. Place the cursor at 300x40 and right click once. Your hanger should now be centred approximately 30 pixels above the ball, (fig 5). If it is not, then use the mover tool and move the hanger until the little hook at the top is one pixel below the top and it is centred on 300.
fig 4 18. Activate the Ornament Top layer. 19. Set the foreground colour to a colour of your choice. I usually use the eye dropper to select a colour from the ball just to keep everything balanced. 20. Choose preset shapes tool - Ellipse, filled, 1, antialias checked. 21. Place cursor at 300x60 and draw an ellipse to 400x135. These setting do not have to be exact. Set them to however it looks best with your ornament. 22. Use magnifyer tool to magnify to 2:1. 23. Choose eraser tool - Round, size 120, hardness - opacity & density 100, step 25. Place the eraser on the right side, so that it is against the ornament hanger and just touching the ball, click once. You should now have a bite out of the elipse as in fig 5.
24. Now do the same thing on the left side of the hanger. 25. Change the eraser size to about 90. Place the eraser cursor overtop of the ornament hanger so that all of the eccess of the ornament top above the hanger is covered. Note: Do Not extend it down to cover any of the top below the hanger. Then click once. Your image should now look similar to fig 6.
fig 6. Now we will put on a separation ring, to separate the patterned portion from the plain top. Set your foreground colour, any colour you wish, I will use the dropper to choose a colour from the pattern. 26. Choose preset shapes Elipse/stroked/5/antialias. Place the cursor at 300x60 and draw an elipse to a tiny bit beyond 400x135. All we want to achieve is a 5 pixel line over top of the seperation between the pattern and the solid colour. It should look similar to fig 7.
27. Choose your eraser tool set to round, size 70, erase all of the parts of the ring which extend outside the ornament. 28. Turn off the ball layer by clicking on the pair of glasses in the layers pallet on the right side of the ball layer. 29. Now make sure either the ornament top or the hanger is the active layer in the layers pallet. Then choose Layers/Merge/Merge Visible. 30. Choose Layers/New Raster Layer. 31. Change the forground colour to white. 32. Choose the Paint Brush set to 3. And draw a single line on the ornament top, as in fig 8 33. Change the forground colour to a shade lighter than the ornament hanger and draw a single line on the hanger, as in fig 8.
34. Choose Images/Blur/Gaussian Blur set to 1:50. 35. Choose Layers/Merge/Merge Visible. 35. Choose Edit/Copy 36. Choose Edit/Copy/Paste As New Image. Set this aside or save it. We will need it shortly. 37. Choose Layers/merge/merge visible. 38. Choose Selections/Select All. 39. Choose Selections/Float. You should now have marching ants all around the ball. You must do the selection this way for the next effect. It will not work using the magic wand. 40. Choose Image/Effects/Cut Out, use whatever settings give you a shadow effect you like. But make sure the, "Fill Interior with Colour" box is NOT checked. The "Shadow colour" may be whatever you like, just click inside the box to make a change. I used black and the following settings: Opacity = 50, Blur = 50, Offset vertical = -25, Horizontal = -25. 41. Choose Selections/Select None. 42.Unfortunately the cut out also places a shadow on the ornament hanger which does not really look good. To remove it simply activate the ornament top we set aside earlier. Choose Edit/Copy. Then set the top aside again if you intend to animate the ornament. 43. Activate your ornament again. For this part magnify your image at least to 2:1 and have the ornament top and hanger showing. Choose Image/Paste/As New Selection. Move the ornament top into place overtop of the original. I found it easiest to use the hook eye on top of the hanger as the guide to make sure it goes into place. If you intend animating the ornament then Choose Windows/Duplicate. Set this aside. Then click on the original image to make sure it is the active image. 44. Choose the magic wand and click on a transparent portion of the work area. 45. Choose Selections/Save to Alpha Channel. Click ok for both pop ups. No need to name it. We will need this to clean the transparent area after applying the reflection to the ornament. 46. Set the foreground colour to white, or colour of your choice. Choose Layers/New Rastor Layer. 47. Go to preset shapes, ellipse, filled, linewidth 1, antialias checked. Place cursor at 300x340 and draw an ellipse to 500x570. 48. Choose the selection tool. Ellipse, feather 0, antialias checked. Place cursor at 330x340 and draw an ellipse to 510x590. Then push the delete key. You should now have a white cresent on the left side of the ornament. 49. Go to Selections/select none. 50. Select Image/blur/gaussian blur. Set radius to 10:00. Click ok. Choose Selections/Load from Alpha channel. Click ok. You shoul have little ants running all around the outside edge and the outside of your ornament. Press the Delet key once. 51. Go to the Layers palette. Move the slider to set opacity. The setting again will depend on your ornament. Keep a close eye on your ornament as you move the slider stop when you achieve an effect you like. I set it to 59 for this one. (fig 9)
52. Now go to Layers/merge/merge visible. If you would like to animate the ornament set aside the original and activate the copy we made earlier. The animation turns the ornament into Chritstmas tree light and to do that we have to put a light inside the ornament. It is really very easy. For those that do not wish to animate go to 70. 53. You may use whatever colour you like for the light, however it should complement the colours in your ornament. I will use an off yellow, #D6D800. So set your foreground colour to the colour you have chosen. 54. Open a new image, 600x600, transparent background, 16 million colours. 55. Flood fill with the colour you have chosen. 56. Choose Image/Deformations/Circle. 57. Choose Image/Resize, click on the Percentage of Original radio button, then change the first setting to 80%. The Resize Type should = Smart Size. If there is a check in the "Resize All Layers" box, turn it off. Turn on the check in the "Maintain aspect ratio" box, and set to 1. Click OK. 58. Choose Edit/Copy. 59. Activate the dupicate of your original ornament again. 60. Choose Layers/New Raster Layer. Name it light. 61. Choose Edit/Past/As New Selection. Carefully move the yellow ball into position overtop of the ball portion of the ornament. When it is a perfect as you can get it, choose Selections/Select None. 62. Choose Layers/Arrange/Send to bottom. No portion of the yellow ball should be seen. If some shows then use the eraser tool to remove offending pixels. 63. Activate the ornament layer. Choose Layers/New Raster Layer. Name it top. 64. Activate the ornament top that we made earlier or if you saved it open it now. 65. Choose Edit/Copy. 66. Activate the duplicate again and make sure the ornament top layer we made, in 63 above, is the active layer. 67. Choose Edit/Paste/As New Selection. Then carefully move this top until it completely covers the original ornament top, the same as we did in 43. Once it is in place Choose Selections/Select None. 68. Choose Layers/Arrange/Move Down. If we have done everything right the top will now be between the yellow ball on the bottom and the ornament on the top. (This step was necessary to prevent light shining through the ornament cap and ruining the effect.) 69. Now Activate the ornament layer and Choose the Layers Pallet. Move the slider until the yellow ball starts to show through the ornament. Not too much, not too little. How much you set this, is entirely up to you. You should now have two images, the original and one that is lighted. Resize both images to whatever size you want and save them in PSP format. Now all you have to do is add your background to both images then go to Animation shop to animate them. (Note: I found it easiest to make the background as a new image, duplicate it, then Copy/paste the ornaments to the background. That way the background remains constant during animation. The only crucial thing is to make sure the lighted ornament is placed in exactly the same positon on the duplicate as the unlighted ornament in the original. I found the easiest way to do this was to place the unlighted ornaments onto the background first then duplicate. The lighted ornaments may then be placed exactly on top of the unlighted ones in the duplicate. And that's it. Number 70 is for those that did not animate. 70. All you have to do is add your background, then merge the layers and your ornament is finished.
I hope you have as much creative fun with ornaments as I have. The variation of designs are limitless using Twirl, Punch & Kaleidoscope. Experiment with the other Deformations as well, you will be amazed by the results. I hope you enjoyed working with this tutorial and that it was clear and easy to follow. If you liked it tell your friends, if not tell me. I have been playing with these ornaments for quite a while and have made a number of scenes utilizing them. I have included one here if you would like to see it. Click here. Cheers Eaglefeather |
|
|

This tutorial copywrite, Robert Valiquette, November 2000.
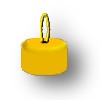
 fig 1.
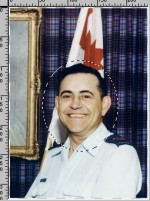 fig 2.
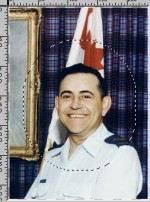 fig 3.
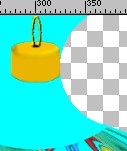 fig 5.
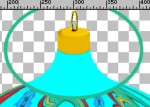 fig 7.
 fig 8.
 fig 9.