Make your own Personal
Pennant
Written for PSP 6 but will work in PSP 7 as well.
 |
 |
 |
 |
You may print this tutorial for your own personal use only.
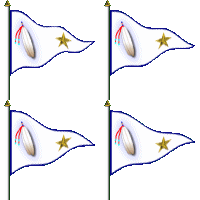
This tutorial will take you through the steps necessary to create your own Animated Personal Pennant.Because this is your own personal pennant you will have to design it yourself. For those not as familiar with PSP as some others, the first part of this tutorial will discuss how to make two basic pennant shapes. Important Note: This tutorial was written to make a transparent gif. Therefore the finished pennant will have slightly jagged edges. I know of no way to avoid this. If you are one of those folks that can not abide jagged edges then you will have to make this pennant with an opaque background. I have indicated steps which may be ignored for those doing it this way. Originally this tutorial had a zip file containing a flagpole tube. As this host, Fortunecities, does not permit zip files, and as cleaning up a jpg for use is just too much trouble I will rewrite the portion of this tut that deals with the placing of the flagpole and get it up as soon as possible. Making a flagpole is not difficult. If you wish to make your own do it at the point in this tut where the flagpole is supposed to be inserted starting at step 16. Make your flagpole on a seperate layer and then merge it.
2. Choose and make one of the following pennant shapes. If you have a different design in mind make that, then go to step 3.
Triangle1a. Choose Preset Shapes/Rectangle/Filled or Stroked and Filled (your bg decides)/width (again your bg decides)/Antialias unchecked/Create as Vector checked. Now draw a rectangle from 100x100 to 300x250. (For the triangle pennants at the top of this page I used, "Stroked and Filled/Width 4", for the one with the blue border and used, "Filled", for the one with just a solid colour.
2a. Choose the Node tool 3a. Place the cursor on the upper, right hand node and drag it down to 300x175. See fig 3. 4a. Next place the cursor on the lower, right hand node and drag it up to 300x175. See fig 3.
6a. Go to Layers/Convert to Rastor Layer. Go to the Layers Palette/Properties and rename this layer, "pennant". Now go to Step 3.
V Cut with twin tails.(Don't have a clue what else to call it. :) )1b. Choose Preset Shapes/Rectangle/Filled or Stroked and Filled (your bg decides)/width (again your bg decides)/Antialias unchecked/Create as Vector checked, and draw a rectangle from 100x100 to 300x250. (For the V Cut pennant at the top of this page I used, "Stroked and Filled/Width 4"). 2b. Choose the Node tool. Right click inside the image. Choose, "Node Edit", from the drop down menu. Your image will turn into a box outline with four nodes, one in each corner. 3b. Place your cursor at position 300x175, (doesn't have to be exact) press and hold the, "Control key", then press once on the left mouse button. Release the, "Control key". You should now have another node half way between the two nodes on the right side. (The new node is shown in red in fig 4.) 4b. Place the cursor on the new node and drag it straight left to approximately the 220 x175 coordinate. See fig 4.
Fig 4.5b. Right click inside the image and choose, "Quit Node Editing". 6b. Next go to Layers/Convert to Rastor Layer. Go to the Layers Palette/Properties and rename this layer, "pennant". Go on now to step 3.
Fig 5.4. All done? Ok, now Go to Image/Resize/Pixel Size 170x170/Type - Smart Size/Resize all layers unchecked/Maintain aspect ratio of: checked and set to 1. 5. Go to Edit/Copy. 6. Go to Image/New/100x100/16mill colors/Transparent. 7. Go to Edit/Paste/As new selection. 8. Go to Selections/Select None. 9. Go to Image/Sharpen/Sharpen. At this point you may either save the original 400x400 work area or close it. We do not need it any longer. 10. Choose the Mover Tool. Place the cursor in the top, left pixel of your pennant and move it into position 10x10. I recommend that you be very precise with this. There must be room for the flagpole and sufficient clearance at the top for the top notch of the pole. 10x10 will give it to you if you are using one of the pennant shapes in this tut. If you have used your own shape you will have to make sure you have a 10 pixel clear area across the top and down the left side. Also you will require a clearance of at least 5 pixels from the tip or tips on the right side of the pennant to the right edge. Fig 6 shows the positioning.
11. Go to Layers/New Rastor Layer. Name it background. 12. Go to Layers/Arrange/Send to bottom. 13. Set the Foreground Colour to green (#00FF00). If any of the colours in your image are anywhere close to that colour, don't use it. Find a solid colour that is not used in your image and choose it instead. Note: If you are not making a transparent gif, add whatever background you like and go to step 15. 14. Choose the Flood Fill Tool and flood fill the background layer with the green or the colour you have chosen. 15. Make your pennant layer the active layer. 16. Go to Layers/New Rastor Layer. Name it flagpole. 17. Choose the Magnifyer tool and magnify the image to 4:1. This magnification is necessary to see the ruler points need for placing the flagpole. The flagpole must be very precisely set.
20. Choose the Rope Selection Tool/Point to Point/Feather 0/Antialias unchecked. You may want to use the Magnifyer Tool to magnify the image to make it easier to see. Now place the cursor approximately 5 pixels above the upper left pixel of the pennant. Click once. Move all around the outside of your pennant keeping approximately 5 pixels away from the outside edge except along the left side. When you get to the bottom left side try to come up that side exactly on the left edge of the pennant. See the first image in fig 8. When you get to your starting point double click and marching ants should appear all around your pennant. 21. Go to Windows/Duplicate. Make three duplicates of the original by choosing Windows/Duplicate three times. After making the duplicates, place them side by side.
22. Make the first image, the image on the left, the active image. 23. Go to Image/Deformations/Wave use the settings shown in fig 9.
24. Go to Selections/Select None, then Go to Layers/Merge/Merge All (flatten). 25. Make the second image active. 26. Go to Image/Deformations/Wave and increase the Verticle Displacement Wavelength from 40 to 46. Then go to Selections/Select None, then Go to Layers/Merge/Merge All (flatten). 27. Make the third image active. 28. Go to Image/Deformations/Wave and increase the Verticle Displacement Wavelength from 46 to 52. Then go to Selections/Select None, then Go to Layers/Merge/Merge All (flatten). 29. Make the forth image active. 30. Go to Image/Deformations/Wave and increase the Verticle Displacement Wavelength from 52 to 58. Then go to Selections/Select None, then Go to Layers/Merge/Merge All (flatten). All of your images should now be deformed something similar to mine. See fig 10.
31. Now comes the tedious part. (Note: if you are not making a transparent gif, go to step 34.) During the deformation and other things we were doing, we ended up with some semi-transparent pixels. All of these must be removed, or you will have an ugly little mess all around the outside of your pennant and flagpole when you save it. The only way I have found to do it is to literally remove them one at a time with the Paintbrush. This is the main reason I suggested doing a pennant before making a flag. A pennant only has four frames, the flag requires 9. But don't get discouraged. It really is not that bad, you will quickly get into the swing of it and it doesn't take that long. 32. Change the foreground colour to the colour of your background and the background colour to the colour of the outside edge of you pennant. In my case it is green and dark blue. See fig 11.
33. Choose the Paintbrush Tool/Square/Size 1/Hardness, Opacity & Density 100/Step 1. Now start removing the semi-transparent pixels by painting over them with the bg colour and at the same time fix any of your pennant colours which may not be right. See fig 12 for a before and fig 13 for an after screen shot of a small section of mine. Note: You will find this easier to do if you magnify to about 19:1. At this magnification even the palest of pixels should be visible, and it is very important to get them all. Any you miss will turn up as little green bugs that will start eating your image, and when they finish the image will start on your PC, and...... :) ).
34. Next, do steps 35 and 36 to each of the images. 35. Press the, "Shift+Control+3", keys of your key board, all at the same time. On the popup window click on, "Optimized Median Cut & Nearest Color", click "Ok". Fig 14.
36. Press the, "Shift+Control+V", keys of your key board, all at the same time. On the popup window click on, "Set the transparency value to palette entry". Then move your cursor over the background of whichever image you are doing and left click once. The colour box on the popup window should change to your background colour, click "Ok". Fig 15. Note: If you are not making a transparent gif, choose, "No Transparency".
Ok, all the hard stuff is now finished. So we will now save each of the images as a transparent gif in preparation for animating them. 37. Make image 1 the active image. 38. Go to File/Export/Transparent gif. On the popup menu check the radio button as in fig 16 then click "Ok". Note: If your are not making a transparent gif, choose, "None".
Name and number it. Do this for each of the images. You must keep them in the order you made them. I named and numberd mine, ef_pen1, ef_pen2, ef_pen3 and ef_pen4. 39. Open Animation Shop.
40. Click on the Animation Wizard button, You will now be presented with 6 popup menus. I have numberd these popups below and indicated what to do on each one.
Your four images will now appear in Animation Shop's Work Area. To preview your animation click on the Play Animation button, 41. Go to File/Save As. You will now be presented with four more popup screens. I'll bet the folks at JASC had a great time designing all these popups, must of had a contest to see who could come up with the most. :).
Well there you have it, one pennant made and saved as an animation, already to adorn your site with something a little unique, at least for the moment. Nothing lasts forever on the web. I sincerly hope you have enjoyed working with this tutorial and if you have any comments, suggestions or questions please feel free to send me an Email. Cheers Eaglefeather
|
|
|

The entire contents of this tutorial � Robert Valiquette, aka Eaglefeather, March 2001.
All rights reserved.
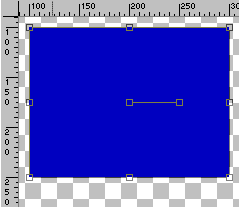
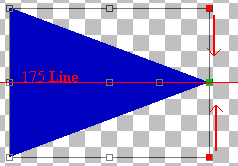
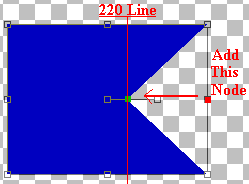

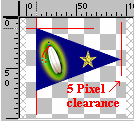 Fig 6.
 Fig 7.
 Fig 8.
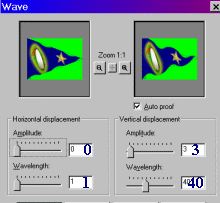 Fig 9.
 Fig 10.
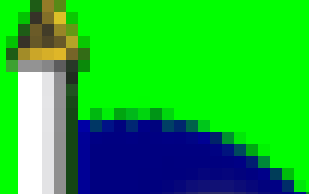 Before, Fig 12.
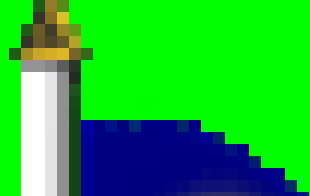 After, Fig 13.
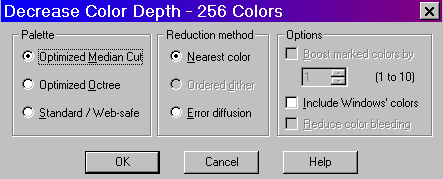 Fig 14.
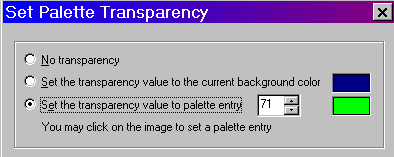 Fig 15.
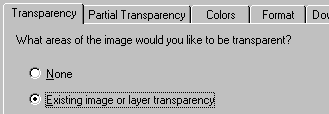 Fig 16.