Basic Wine Glass
Tutorial
Written for PSP 6.
PSP 7 users please note, this will work in ver 7.Tools may be located differently then stated in the instructions.
Also, draw all elipses using the right mouse button.
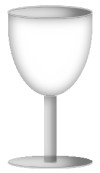
The objective of this tutorial is to show a method for making a very basic wine glass with Paintshop Pro. The final wine glass which results from following this tutorial is not ment to be a final image. This is intentional. If I show you how to make my final wine glass, that is what you will get, my wine glass. By playing or experimenting with various settings, changing a few things here and there, in other words using your own creativity, you will be able to produce a very fine wine glass. And the best thing about that is it will be yours, and yours alone.Should you have problems or have questions please send me an email. You may find following this tutorial easier if you print it out. To print, make sure your printer is turned on, click on the print icon of your browser or click on File/Print. So let's jump right in and don't be afraid to make any changes or go your own route anywhere along the way.
2. Choose Layers/New Rastor Layer. Name it "Base". 3. Choose Layers/New Rastor Layer. Name it "Base B". 4. Choose Layers/New Rastor Layer. Name it "Stem". 5. Choose Layers/New Rastor Layer. Name it "Glass". 6. Choose Layers/New Rastor Layer. Name it "Rim". By making all our layers now they will be ready when we need them. 7. Set the Foreground Colour to "White" and the Background to "Light Grey", (#C0C0C0). We will be switching back and forth between these two colours during this tut. 8. Make the Glass layer active.
9. Choose Preset Shapes
10. Place the cursor at 200x120 and draw an ellipse to 270x240.
11. Choose the Selection Tool 12. Place the cursor at 200x100. Draw an ellipse to 270x110.
13. Choose Edit/Clear or press the "Delete" key. Your image should now look like this:
14. Choose Selection Tool set to "Rectangle", don't change the other settings. Draw a rectangle around the upper portion of the ellipse as shown in fig 5.
15. Choose Edit/Clear or press the "Delete" key. 16. Choose Selections/Select None.
17. Choose Magic Wand
Left click inside the image to select it. Your image should now have the marching ants all around the outside. 18. Choose Image/Effects/Cut Out with these settings:
Click Ok. Your Glass should now look like this:
19. Activate the Rim layer. 20. Choose Preset Shapes/Ellipse with these settings:
21. Place the cursor at 200x100. Draw an ellipse to 270x110.
22. Choose the Magic Wand with the same settings as before. 23. Left click on the ellipse we just made. Marching ants will appear around your image. 24. Choose Images/Effects/Cut Out using these settings:
Click Ok. 25. Choose Selections/Select None. 26. Change the Foreground colour to the Light Grey we chose in step 7. 27. Choose Preset Shapes. Change Style to "Stroked" and line width to 2. 28. Place the cursor at 200x100. Draw an ellipse to 270x110. Your Rim image should look like this:
29. Activate the Base layer. 30. Change the Foreground colour back to "White". 31. Choose Preset Shapes with these settings:
32. Place cursor at 200x350. Draw an ellipse to 270x360. 33. Choose Magic Wand. Don't change the settings. 34. Left click on the base ellipse. The marching ants should appear. 35. Choose Image/Effects/Cut Out. Don't change the settings. Click Ok. 36. Activate the Base B layer. 37. Change Foreground colour back to Light Grey. 38. Choose Preset Shapes. Change Style to "Stroked" and Line Width to 2. 39. Place cursor at 200x350. Draw an ellipse to 270x360. 40. Choose Selection Tool/Rectangle/Feather 0/Antialias checked. 41. Draw a Rectangle from about 115x325 to 290x350. See fig 13.
42. Choose Edit/Clear or press the "Delete" key. 43. Choose Selections/Select None. 44. Activate the Stem layer. 45. Change the Foreground colour back to "White". 46. Choose Preset Shapes/Rectangle/Style - Filled/Line Width - 1/Antialias checked. 47. Draw rectangle from 190x240 to 210x350. 48. Choose Magic Wand. Same settings. 49. Left click inside the rectangle. The marching ants should appear. 50. Choose Image/Effects/Cut Out. Use these settings:
51. Choose Selections/Select None.
To join the stem to the base it is necessary to use the Retouch Tool
52. Very carefully soften the edges inside the area with the dashed white line, shown in fig 17, to blend the stem into the base.
53. Activate the base layer and use the Retouch Tool to soften the sharp base outline that shows through the stem. 54. Activate the stem layer again and soften and blend the area where the stem joins the bottom of the glass. All this softening and blending should give a result like this:
Congratulations. You have just made a basic wine glass.
I hope you have enjoyed working with this tutorial and will go on to improve your skills at making glasses. By changing the size of the ellipse you will be able to make brandy snifters, champagne glasses and all manner of other fancy glasses. With just a little creativity this basic glass can become something extraordinary, and it will be yours. Happy Creating, Eaglefeather |

|
|
This tutorial copywrite, Robert Valiquette, January 2001.
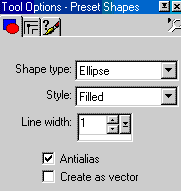 Fig 2
Fig 2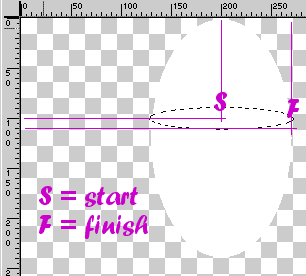 Fig 3.
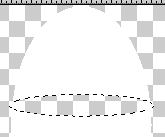 Fig 4.
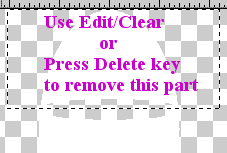 Fig 5.
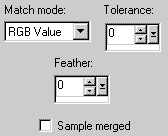
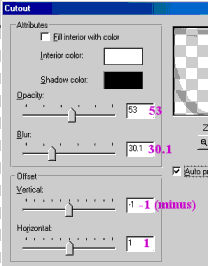 Fig 6.
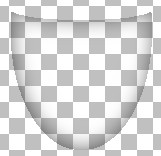 Fig 7.
 Fig 11.
 Fig 12.
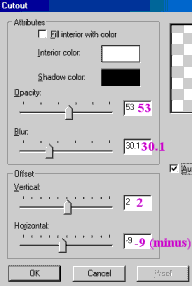 Fig 14.
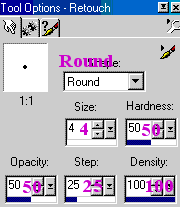 Fig 16.
 Fig 17.