A Basic Method for Making a
CAGE
Written for PSP 6.
PSP 7 users please note, this will work in ver 7.
Tools may be located differently then stated in the instructions.
Also, draw all elipses using the right mouse button.
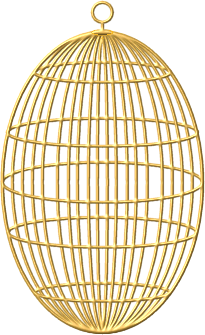
This tutorial may be printed for your own use.In this tutorial we will look at a technique or method of making a circuler or elipticle cage with PSP 6. The technique will work with PSP 7 but cursor placement for making the rings/bars and the location of tools is slightly different. Credit for the idea for this tutorial goes to, Nanson, a wonderful digital artist and fellow member of PSP Connections. This is a basic tutorial for making a cage, into which objects may be placed. It is fairly simple to make and beginners to PSP should not have any difficulty with it. I have also made a tutorial for a Birdcage, it is much more difficult so I would advise trying this one first. For this tutorial it is very important to follow the ruler settings exactly, even a one pixel difference could ruin the final image. So make sure your rulers are turned on. For those that don't know about the rulers they appear along the top and left side of your image work area. To turn them on or off go to the main menu along the top and choose View/Rulers. Just so we all are working from the same plan, all ruler references are given for the top ruler first then the side ruler. ie: 200x300 means the ruler marker should be on 200 on the top ruler and 300 on the side ruler. Also the word "Choose" is used for selecting tools from the tool bar and "Go to" for items on the main menu. 1. Open a new image. Go to File/New/400x400/BG - White/16 mil colours. (Note: I used white for the background to make the cage stand out for drawing. Use whatever colour you like.) 2. Go to Layers/New Rastor Layer, name this layer "Front". 3. Set your Foreground colour to whatever colour you like. For this tutorial I used #FDB303. 4. Choose Preset shapes/Elipse/Style - Stroked/Size - 3/Antialias - Checked/Create as Vector - Unchecked. Draw an elipse from 200x200 to 300x350. 5. Go to Layers/Duplicate Layer. Rename this layer, "back". 6. Go to Layers/New Rastor Layer, name this layer, "front rings". 7. We will now add some Horizontal bars/rings. Choose Preset Shapes/Elipse with the same settings. Draw elipses from: 200x200 to 300x220, 200x90 to 267x100, 200x310 to 267x320 200x150 to 295x165 200x250 to 295x265 Your image should now look like fig 2.
8. Go to Layers/Duplicate. Rename this duplicate layer, "back rings". 9. Our objective now is to remove the front portion of the bars/rings. Open the Layers Palette and make sure the "back rings" is the active layer and at the same time turn off the "front rings" layer by clicking on the pair of glasses.
Choose the Selections tool/Rectangle. Draw a rectangle from approximately 120x90 to 290x110. Then press the "Delete" key of your keyboard or go to Edit/Clear. See fig 4.
Now remove the front portion from each of the remaining bars/rings on this layer. When done go to Selections/Select None. 10. Now go to the Layers palette and activate the the "front rings" layer by clicking on it and then click on the glasses of the "back rings" layer to turn it off.
11. Choose the Selections tool/Rectangle again and this time select and delete the back portions of the bars/rings. 12. Go to the Layers Palette and turn off Layer 1. This is the layer that has your current background colour. Also make sure that the "back" and "back rings" layers are turned off.
13. Go to Layers/Merge/Merge Visible. Rename this layer "front" by going to the Layers Palette and right clicking on your Merged layer. Then choose Properties. Enter the new name in the Name box, then click Ok. 14. Now back to the Layers Palette. Turn off "layer 1" and "front", make sure the "back" and "back rings" layers are on and one of them is the active layer. Then do the same thing as in step 13 only rename this layer "back". 15. Go to the Layers Palette and turn on all layers and make the "front" layer the active layer. 16. Go to Layers/New Rastor Layer. Name this layer, "front bars". 17. We are now going to add the verticle bars. Choose Preset shapes/Elipse with all the same settings we used before. Draw elipses as follows: 200x200 to 280x350, 200x200 to 260x350, 200x200 to 235x350, 200x200 to 215x350. You should end up with something like fig 7.
18. Activate the "back" layer and then go to Layers/New Rastor Layer. Name it "back bars". Leave the "front bars" layer turned on during this part to use as a guide for placing the back bars. The image will look very crowded but don't let this bother you 19. Choose Preset Shapes/Elipse with all the same settings we used before. Draw elipses as follows: 200x200 to 290x350, 200x200 to 270x350, 200x200 to 245x350, 200x200 to 225x350, 200x200 to 205x350. Your image should look like fig 8.
20. Go to Layers Palette and turn off the, "Layer 1", "front" and "front bars" layers. Then activate either the "back" or the "back bars" layer. 22. Go to Layers/Merge/Merge Visible. Rename this Merged layer "back". 23. Go to Layers Palette and turn off the "back" layer. Turn on the "front" and "front bars" layers and make sure one of them is the active layer. 24. Go to Layers/Merge/Merge Visible. Rename this Merged layer "front". 25. Activate the "front" layer and turn off the "back" layer. Choose the Magic Wand and click anywhere on the image. Go to Image/Effects/Sculpture and in the Preset box choose "gold" then click Ok. Go to Selections/Select None. (For those with Eyecandy or Bladepro you may want to use your own filter to give the cage a finish.) 26. Activate the "back" layer and turn off the "front" layer. Choose the Magic wand and click anywhere on the image. Go to Image/Effects/Sculpture and again choose gold. Go to Selections/Select None. 27. Activate the "front" layer. Go to Layers/New Rastor Layer. Name this new layer "hanger". 28. Choose Preset Shapes/Circle. Same settings as we used for the Elipse. Draw a circle from 200x30 to 210x40. See fig 9. Change the tool to an Elipse and set the Style to Filled. Draw an Elipse from 200x50 to 210x51. See fig 10. 29. Choose the Draw Tool/Single Line/Style - Stroked/ Width - 3/Antialias - checked/ the other two unchecked. Draw a straight line from 200x40 to 200x50. See fig 11 30. Go to Image/Effects/Sculpture use the "gold" preset again, click ok. See fig 12.
31. Go to the Layers Palette and turn off "layer 1" and "back". 32. Go to Layers/Merge/Merge Visible. Rename this layer "front". 33. Your cage is now finished. To place an object in the cage simply add a layer between the "front" and "back" layers. Then place your object(s) on this new layer. It might also be a good idea to save the two parts of the cage as a tube. For those that do not know how to make a tube from your image the following steps will walk you through the process. Your image in its present form cannot be made into a tube because a tube must have only one layer, be 24 bit and have a transparent background. Therefore both parts of the tube must become separate images. The steps below show how to do it for the "front" of your cage, just do exactly the same thing for the back. 1. Make the "front" layer the active layer 2. Go to Edit/Copy then Edit/Paste/As New Image. 3. Go to File/Export/Picture tube. 4. In the pop up window leave all the settings as they are and type in a name for your cage in the Tube Name box. ie: "Cage, ovalfrnt". 5. Click Ok. Note: If you want to make a tube of the whole cage as one piece, go to the Layers Palette and turn off "layer 1". Make sure the other two layers are turned on. Go to Layers/Merge/Merge Visisble, then follow steps 3, 4 and 5 above.
That is all there is to it. To use the tube choose the Tube Tool, If you would like to see this cage in a scene click here. Use your browser back button to return here. If you would like a more difficult challenge then go on to the Bird cage tutorial. I hope you have enjoyed working with this tutorial. Should you have any difficulties please feel free to ask me for help. Just click here, Eaglefeather to send me an email. Cheers Eaglefeather |

|
|
The entire contents of this page � Robert Valiquette, aka Eaglefeather, February 2001. All rights reserved.
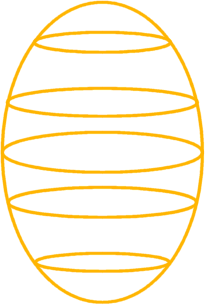 Fig 2.
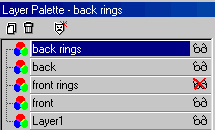 Fig 3.
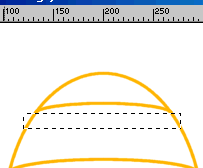 Fig 4.
 Fig 5.
 Fig 6.
 Fig 7.
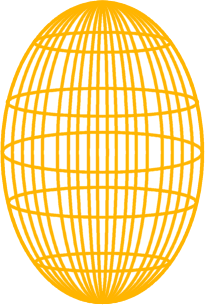 Fig 8.


