You may print this tutorial for your own personal use.
This tutorial will take you through the steps necessary to creat a Wicker basket similar to the one shown above.
This tutorial was made possible by the knowledge gained from a tutorial for making a really wonderful, Vine Wreath, by my very good friend, Auntie Em. Please visit her and give the wreath a try, you won't be sorry, I promise.
As a result of difficulties that some people were experiencing trying to construct this basket, changes were made to this tutorial on 21 March 2001. The changes effect the numbering of most of the steps, and the actual changes are in steps 5 to 12 and 17 to 26. The main problem involved the placing of the wicker applications, it was very easy to get lost using the original method. Thanks to Laura, a Graphic Bud's friend, I finally became aware of the problem.
The new method involves the use of a "ruler guide" which may be downloaded and made into a PSP tube. Fortunecity does not permit downloadable files so you will have make the image into a tube. The guide image is right here along with appropirate instructions for turning it into a tube.
Use the ruler/guide whenever you want to make a wicker basket.
I am truely sorry for any inconvenience this may have caused, however there are some things over which we have no control.
Ok Eaglefeather enough already, we want to get started.
1. New Image/400x400/Transparent/16mil colours.
2. Go to Layers/New Rastor Layer. Name this layer "guide"
3. Go to Layers/New Rastor Layer. Name this layer "wicker".
4. Make the "guide" layer the active layer. Note: This is not the Ruler Guide layer. The Ruler Guide will come later in the tut.
5. Choose Preset Shapes/Elipse/Stroked/Size 3/Antialias checked/Create as Vector Unchecked. Draw an elipse from 200x200 to 330x230. Use any colour you like, I used black. Also you may want to place red dots at the appropriate cross over points, it will make drawing the line easier. See fig 2 for positions, the blue lines, arrows and numbers are not needed. I placed them there just to show you where to place the red dots.
 Fig 2. Fig 2.
6. Make the "wicker" layer the active layer.
7. Choose the Paintbrush tool/Round/Size 3/Hardness, Opacity & Density 100/Step 1. Set the colour to #AD7300. Start at top center and draw a line in and out of the guide all the way around. Try not to go too far out from the guide line. See fig 2a.
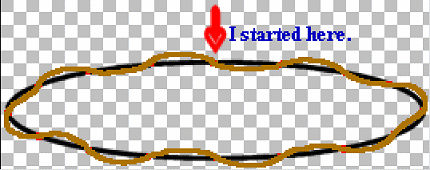 Fig 2a. Fig 2a.
8. Go to Image/Effects/Inner Bevel/ /Width 5/Smoothness 10/Depth 3/Ambience 0/Shininess 20/Angle 315/ Intensity 42/Elevation 36. Click Ok. /Width 5/Smoothness 10/Depth 3/Ambience 0/Shininess 20/Angle 315/ Intensity 42/Elevation 36. Click Ok.
9. Go to Layers/New Rastor Layer, name this layer "wicker 2".
10. Choose the Paintbrush tool/Round, same settings as before. Place the cursor at 200x70 again only this time draw your line in and out from the opposite side. See fig 4.
 Fig 4. Fig 4.
11. Go to Image/Effects/Inner Bevel. Same settings as before.
12. Choose the Eraser Tool/Round/Size 3/Hardness, Opacity & Density 100/Step 1. Carefully erase the small section of the new line on every other crossing. The screen capture shows the starting point at 200x70 with a blue line. The cross overs to erase are circled in green the others in red, the screen captures, figs 5 & 5a, should be self explanitory.
 Fig 5. Fig 5.  Fig 5a. Fig 5a.
When you are finished the two pieces of wicker should be intertwined all the way around.
Now in order to turn this little elipse of wicker into a basket you must save it as a tube.
13. Go to the Layers Palette and delete the "guide" layer. We do not need it anymore. Then make either the "wicker" or the "wicker 2" layer the active layer.
14. Go to Layers/Merge/Merge Visible.
15. Go to File/Export/Picture Tube. Unless you are well versed in the settings for the pop-up, don't make any changes other than to enter a name for your tube in the Tube Name box.
Ok, now we are ready to start constructing our basket. We will continue to work with a 400x400 image work area so Go to the Layers Palette and delete the two "wicker" layers. You should now have a blank image.
16. Go to Layers/New Rastor Layer. Name it "basket".
17. Go to Layers/New Rastor Layer. Name it "ruler" or "guide" or whatever you like, I will refer to it for the rest of this tut as ruler/guide. Make sure this is the active layer.
18. Choose the Tubes Tool and find the, "ruler guide" tube or whatever you named it. Place the cursor at approximately 200x250 and click once. (This is not criticle. By using 200x200 everything is centered and there is plenty of room, top, bottom and sides for the basket.) See fig 6 & fig 6a. (Note: I placed fig 6a on it's side to save space).
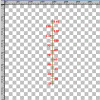 Fig 6. Fig 6.  Fig 6a. Fig 6a.
Okay, better give you an explanation of how this ruler works. In order for the basket to go together properly the space between each application of the wicker layers must not be more, nor less than 2 of the PSP rulers points. This is very difficult to do, it requires patience and concentration. The ruler/guide tube simplifies the whole process and makes it much easier to keep track of how many wicker applications have been made as well as giving the exact points at which to apply each successive application.
The ruler/guide starts at 10 on the very bottom and goes up to 130 at the top. (These numbers are based on the Scale of the tube, not the PSP top and side ruler). All even points are marked in red, all odd in green. The black line is the exact center line for the basket. All applications of the wicker tube must be made on this line or the edges of the basket will be uneven. When making a tube application the cursor must be on the portion of the red or green marker that rests on the black line. See fig 6b.
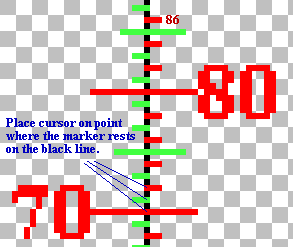 Fig 6b. Fig 6b.
Our first tube application will have a Scale of 70 and will be applied at the 70 mark of the ruler/guide. This will make it very easy to keep track of your applications and where to place each one. As we proceed with the tut I think this will all become very clear. If not then I'd say it's time for me to change hobbies. Something simpler maybe, like trying to fly by jumping off the top of very tall buildings.
19. Go to the Layers Palette and make the "basket" layer the active layer. It should be under the "ruler/guide" layer. (If you don't have the "ruler/guide" layer on top of the "basket" layer you will not be able to see the marks.)
20. Use the Magnifiyer Tool to increase the magnification to 7:1. This will make it much easier to place the wicker. (Using this method it is not necessary to see the whole basket. It is only necessary to be able to see the ruler/guide clearly). Use the bottom and side sliders to position the ruler/guide so that the marks 70 to 86 are within your work area. Place the cursor in the blue area of the Tool Options window, press and hold the left mouse button then drag the window down so it is in a comfortable, easy to access position close to where you are working. See fig 6c.
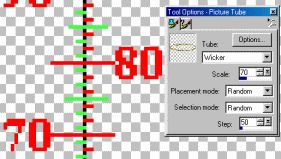 Fig 6c. Fig 6c.
21. Go to File/Preferences/General Program Preferences. Click on the Dialogs and Palettes tab. Make sure the Enable Automatic Rollups is unchecked. If it isn't click on the check box, then click Ok. This is necessary to keep the Tool Options window open while we construct the basket. When we are finished constructing the basket, come back here and recheck the box.
22. Choose the Tube Tool and find your "Wicker Tube", then use these settings. Scale 70/ Placement Mode - Random/Selection Mode - Random/Step 50.
23. Place the cursor on the 70 mark of the ruler/guide and make the first "Wicker Tube" application.
24. Go to the Tool Options window and change the scale to 71. Place the cursor on mark 71, the first green mark above the 70 mark, where it joins the black center line of the ruler/guide, and make the second application of the "Wicker Tube".
25. For each successive application of the "Wicker Tube" increase the Scale in the Tool Options window by 1 and then apply the tube at the next mark up, alternating red, green, red, etc. Should you forget which mark you are supposed to use, simply look at the Scale in the Tool Options Window. (For example, if the tube scale is 83 then apply the tube to mark 83, which because it is an odd number would be a green mark.
Keep adding applications until your basket is as big as you require. For this tutorial I will add 16 applications of the tube, my last application therefore is at mark 86.
As you can see, (fig 7), increasing the Scale by one after each application of the tube gives a nice gentle flare to the sides of the basket.
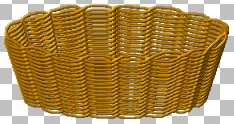 Fig 7. Fig 7.
If you wanted to give more of a flare then increase the scale factor by 2, 3 or possibly 4 for each successive application of the "Wicker Tube". Experiment with it.
If you want to have more space between the wicker strands, as is sometimes the case with real wicker, then go up by more than two points per application. Again experiment with it.
Before continuing go to File/Preferences and reset the Automatic rollup for the drop down windows.
Look closely at your basket and you may see the background showing through in places where we don't really want background to show through. In the screen capture below, (fig 8), I have circled in red the area we don't want the bg to show through and in green the areas where it is ok.
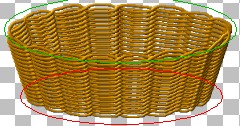 Fig 8. Fig 8.
26. If you have been following this tutorial exactly, you should have a blank layer named Layer 1 on the bottom in the Layers Palette. Make this the active layer.
27. Go to Layers/New Rastor Layer. No need to name it. But it must be under the "basket" layer and make sure it is the active layer before going on to step 28.
28. Choose the Paintbrush Tool/Round, change the size to one that is comfortable for you to work with, I am using 23, all other settings stay the same as before. Now paint in all those unwanted bg areas that are showing through within the red circled area. (For those unfamiliar with PSP, you may do this right ontop of your basket, the colour will only go on the active layer which is the one below.)
29. Go to the Layers Palette and turn off all layers except the "basket" and the one you just painted on.
30. Go to Layers/Merge/Merge Visible. Rename this layer "basket" and make it the active layer.
At this point you must decide wheather you want to be able to place things in the basket or not. If not go on to Step 37. If you do then go to step 31.
31. Choose the Freehand Selection (Rope) Tool/Point to Point/Feather 0/Boxes Unchecked. Again you may want to magnify to make this process easier to see. I magnified to 2:1. Carefully select the entire back portion of the basket. I have outlined the portion of the Marching Ants of the selection in red across the front part of the basket to make them easier to see. See fig 9.
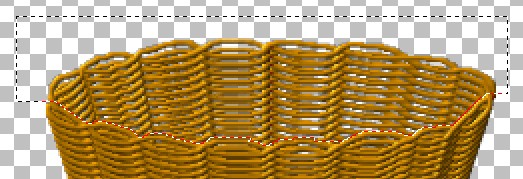 Fig 9 Fig 9
32. Go to Edit/Copy.
33. Go to Edit/Clear or press the Delete key of your key board.
34. Go to Selections/Select None.
35. Go to Edit/Paste/Paste As New Layer. Rename this layer, "back" or "basket back".
36. You will most likely have to use the Mover tool to align the back so it fits back into the spot we just deleted it from. If you watch real close it goes into position with no problem.
Ok, you now have a basket in two pieces. The only thing missing is a handle. This is quite simple to make. We will use the same technique that we used to make the Wicker. You may make the handle in any shape you like or follow along to make the one shown at the top of this tut.
37. Make the "back" layer the active layer.
38. Choose Preset Shapes/Elipse, same settings we used in step 5, plus place a check in the vector box. Yup, we gotta use vectors here. Draw an elipse from 200x200 to 310x360.
39. Choose the Node Edit Tool,  . Right click inside the image and select Node Edit from the pop-up menue. . Right click inside the image and select Node Edit from the pop-up menue.
40. Move or should I say drag the centre nodes on both sides up to 180 on the side ruler. The red arrow on the screen capture represents the 200 position the green arrow represents the 180 position. The final position on the right is 310x180 and on the left 90x180. See fig 11.
 Fig 11. Fig 11.
41. Press and hold the "Control" key, then place the cursor at approximately 310x160, the cursor must be on the brown of the elipse. You may have to move off the 310 slightly, and that is ok, but you must stay on the 160, then left click once. This will place a new node at that position. Now go across to the other side and do exatly the same thing. The position on the left side is approximately 90x160. Now you should have two new nodes, the little black squares, as shown in fig 12.
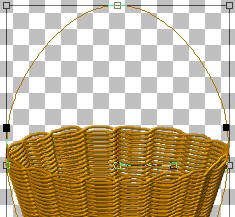 Fig 12. Fig 12.
|
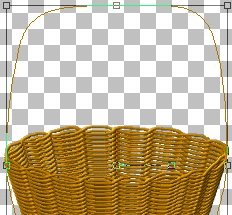 Fig 13. Fig 13.
|
42. Left click and hold the mouse button down on the right node. Drag the node up to position 300x90 and release the button. Now do the same for the left node, it goes to position 100x90. Your elipse should now look something like fig 13 above.
43. Go to Layers/Convert to Rastor.
Are you still with me......oh... yes.... there you are, I see you hiding behind the couch. You can come out now we are all finished with those nasty little vectors.
44. Go to the Layers Palette and rename this new layer "guide".
45. Choose the Eraser Tool/Round, change the size to about 13 all other settings are the same as we used in step 12. Erase all of the bottom portions of the elipse. The screen shot, fig 14, shows where I started to erase on the right side and fig 15 where I finished on the left.
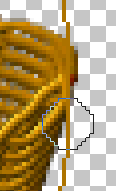 Fig 14. Fig 14.
|
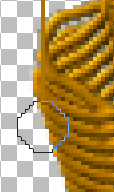 Fig 15. Fig 15.
|
46. Go to Layers/New Rastor Layer. Name this layer "strand 1".
47. Choose the Paintbrush/Round, settings the same as in step 7. We will again draw a line in and out across our guide line. This time the spacing between cross overs is 30.
48. Go to Image/Effects/Inner Bevel. Same settings as before.
49. Go to Layers/New Rastor Layer. Name this layer "strand 2".
50. Choose the Paintbrush/Round. Same settings. Draw another line in and out accross the guide line but on the opposite side of the one we just drew.
51. Go to Image/Effects/Inner Bevel. Same settings.
You may quit now or if you would like your handle to have more wicker, draw another line. This time you would cross over in the middle of the hoops made by the other two strands. See fig 16. If you are going to make a third strand be sure to put it on a new layer and apply the inner bevel when you are finished.
 Fig 16. Fig 16.
52. Choose the Eraser Tool/Round/Size 3, all other settings stay the same. Now we have to erase some of the cross overs to give the intwined effect. If you made a third strand turn it off for a moment and make the "strand 2" layer active. Now erase the cross over of strand 2 at every other cross over, just like we did in step 12. If you made a third strand turn it back on when you have finished with the first two. Now do exactly the same thing. Remember it goes over & under, over & under, etc., all the way around. See fig 17 for the finished handle.
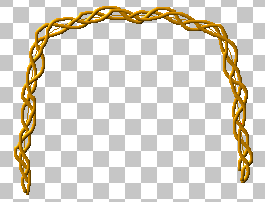 Fig 17. Fig 17.
53. Go to the Layers Palette and delete the "guide" layer. Then make sure the "basket" and "back" layers are turned off. Make one of the "strand" layers the active layer.
54. Go to Layers/Merge/Merge Visible. Rename this layer "handle".
55. Go to the Layers palette and turn on the "basket" and "back" layers. Make the "basket" the active layer. Either drag the "basket" layer to the top or Go to Layers/Arrange/Move to top. The "basket" layer should now be at the top.
It is possible that the handle make stick out a little too far where it joins the basket on each side. The next few steps will show you how correct this. You may want to do this anyway because it will give more realism to your basket.
56. Make the "handle" layer the active layer.
57. Go to Layers/New Rastor Layer. No name needed.
58. Choose the Paintbrush Tool/Round/Size 3, other settings same as before. Now carefully draw a line, on both sides, from an appropriate point where the handle joins the basket downward and taper it into the the side of the basket as you go. See figs 18 & 19. The idea here is to cover the extruded bit of handle and at the same time give the impression the handle is attached to the side.
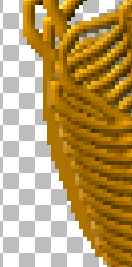 Fig 18. Fig 18.
|
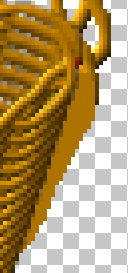 Fig 19. Fig 19.
|
59. Go to Image/Effects/Inner Bevel, same settings.
60. Turn off the "basket" and "back" layers. Make the "handle" layer active.
61. Go to Layers/Merge/Merge Visible. Rename this layer, "handle".
And that my friends, is that. All you have to do now is decide if and how you want to save your basket. If you want to use it as a tube and still be able to put things in it, the front and back pieces must be saved as individual tubes. I have also saved the handle as a tube seperate from the front and back pieces of the basket. This way the handle is always available for any other baskets I might make. These decisions are yours.
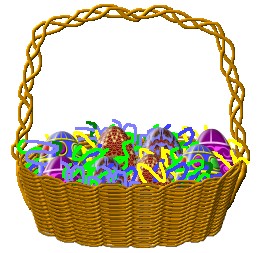 |
All manner of objects may be placed in the basket, such as these Easter Egg's, made from my Easter Egg Tutorial |
If you would like your basket to be a different colour than the brown used, go to Color/Colorize and set the Hue and Saturation to the colour you want. Fig 22 was coloured with a Hue of 146 and Saturation of 124.
One other note, if you need a quick, easy basket and don't really need any flare to the sides then select the "Wicker Tube", set the Scale to the size you need, and the Step to 5. Place the cursor at the point you wish to place the basket. Press and hold the left mouse button as you drag the "Wicker Tube" upwards. When the basket is as big as you need, stop and release the mouse button. Remember you must keep the same centre line all the way up. This may take a few practice runs until you get the results you desire. Fig 21 is an example of this type of basket.
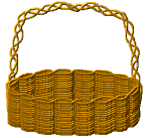 Fig 21. Fig 21.
|
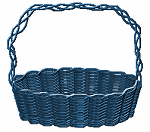 Fig 22. Fig 22.
|
I hope you have enjoyed working with this tutorial, and haven't run into anything like the problems I had trying to write it. Should you run into difficulties or find something in this tut that is not right please send me an EMail. I will do my best to answer your questions or fix the problem.
Cheers
Eaglefeather |
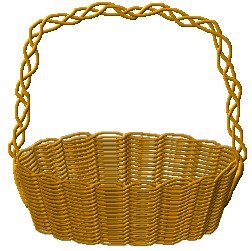
 Fig 16.
 Fig 17.

 Fig 2.
 Fig 2a.
 /Width 5/Smoothness 10/Depth 3/Ambience 0/Shininess 20/Angle 315/ Intensity 42/Elevation 36. Click Ok.
 Fig 4.
 Fig 5.
  Fig 5a.
 Fig 6.
  Fig 6a.
 Fig 6b.
 Fig 6c.
 Fig 7.
 Fig 8.
 Fig 9
Fig 9 Fig 11.
 Fig 12.
 Fig 13.
 Fig 14.
 Fig 15.
 Fig 18.
 Fig 19.
 Fig 21.
  Fig 22.